Gutter Cleaning Gainesville FL removes leaves, twigs, dirt, and other debris from your gutter. It’s a necessary home maintenance task to protect your property from water damage and prevent pest infestation.
Gutter cleaning requires a ladder and a few key tools: safety goggles, gloves, a garden trowel or scoop, a bucket, and a brush for the dirty bits.
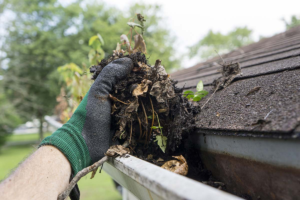
Gutters help channel rainwater from the roof away from the building foundations. When they become clogged, water can seep through the walls and ceiling, leading to extensive damage that requires costly repairs. Gutter cleaning helps prevent this by ensuring water flows smoothly and keeping your home safe and dry.
A good rule of thumb is to have your gutters cleaned at least twice a year. However, your property’s specific conditions may require more frequent cleanings. Gutter cleaning services can advise you on the best cleaning schedule for your property.
Gutter cleaning is an important home maintenance service that also helps maintain your home’s curb appeal. Over time, a dirty and cluttered gutter can make your home look unkempt and uncared for. Regular cleaning can eliminate the buildup of leaves, twigs, and other debris that gives your home a drab appearance.
One of the most important benefits of gutter cleaning is its ability to prevent basement flooding, which can ruin furniture and other belongings housed in this space. Moreover, clogged gutters can promote the growth of mold and mildew that can be harmful to your health. Additionally, damp environments are ideal breeding grounds for rodents and pests.
A clogged gutter can also cause leaks and other structural problems that can damage your roof and the entire building. This can reduce the resale value of your property. Gutter cleaning is an essential service that helps to protect your investment and extend the lifespan of your gutters.
It is essential to hire a professional gutter cleaner to perform this job. Professionals use specialized equipment and techniques to remove stubborn dirt and debris from the gutter system, including the downspouts and outlets. They can also clean the fascia board, if necessary. In addition, they can use pressure washing to restore the appearance of your gutters. This service will help you save money in the long run by preventing costly water and structural damage to your property. It will also help to enhance your property’s curb appeal and boost its resale value.
Prevents Pest Infestation
A clogged gutter can make an ideal home for pests. Pests like mosquitoes, rodents and birds can nest in clogged areas and damage the interior of your roof and exterior walls of your house or commercial building. Regular gutter cleaning prevents these pests from finding a habitat and makes it less attractive for them to inhabit your property.
Gutters that are clogged with debris and decomposed organic material can also contaminate groundwater and promote the growth of mildew and mold, which are harmful to human health. Regular gutter cleaning eliminates these contaminants and ensures that rainwater and ice flow properly through your roof and down your spouts.
In addition, clogged gutters can cause rainwater to overflow and seep into your roof, which can lead to rot and leaks. This can also damage your soffit, fascia and roof deck, which can cost you money to replace or repair. By maintaining free-flowing gutters, you can save yourself a lot of money and stress by protecting your roof from water damage.
Gutter cleaning can be done with a ladder or you can use a power washer, wet/dry shop vac, or a pressure washer with special attachments to spray or suck debris out of the gutter. In either case, you should always wear a pair of safety glasses and follow proper ladder usage techniques. If you decide to do this job yourself, you should start by removing all visible debris with your hands or a rake. Then, you should use a hose to wash away dirt and finer particles and a handheld blower to get rid of any remaining leaves or pine needles.
Another way to help prevent pest infestation is to perform routine inspections of your home and commercial building. Check for cracks, holes and other potential entryways, including screened windows and doors with tight-fitting weather stripping, and seal these openings as soon as you find them. Also, make sure that woodpiles are kept away from your house, bushes are trimmed, and other debris is removed regularly. This will reduce the number of places for pests to hide and enter your home or business.
Prevents Mold and Mildew
When warm temperatures combine with high humidity, mold and mildew will thrive. These fungi can cause serious respiratory issues for people with allergies or asthma1.
Mold and mildew require a damp environment to grow2. This may be from condensation, water in air or on surfaces, or it could be caused by poor drying after showers, leaks or improper cleaning. They also need food and can be found on organic material such as wood, paper, leather or textiles. Mold and mildew are difficult to get rid of once they set in, but they can be prevented by keeping surfaces clean.
Dirty gutters create clogs that cause rainwater to overflow during rainfall. This leads to water puddles, which create ideal conditions for the growth of mold and mildew. Clogged gutters can also create ice dams in colder climates, which further blocks water flow and allows moisture to soak through roof shingles. This can lead to rot, shingle damage and roof leaks.
Regular gutter maintenance, including a thorough inspection and repair of damaged areas, will help prevent the growth of mold and mildew. A professional gutter clean uses telescopic gutter clearing and vacuum tools to remove debris, leaves and moss and wash down the interior of the gutter. Regular inspections and maintenance of gutters will also keep the interior free from clogs and the exterior free from discoloration, rusting and other damage.
If you have a leaking gutter, it is important to fix it as soon as possible to prevent further damage and to protect your property value. Leaky gutters can damage your home, causing costly structural repairs, and may attract pests, such as rodents and insects.
If you notice mold or mildew on a surface, it is important to remove it as quickly as possible to prevent further spread. Mold and mildew spores can be spread through the air, so it is important to open doors and windows to encourage ventilation. It is also helpful to use exhaust fans in kitchens and bathrooms, and vapor barriers in basements. If you find any stains on fabrics, such as curtains and slipcovers, they can be treated with a mildew-resistant spray.
Prevents Damage to Your Roof
Gutters work in tandem with your roof to keep water away from your walls, foundation and home. However, gutters can only do this effectively if they are free from debris like leaves, twigs, moss, seeds and more. As these elements build up in your gutters they can cause overflow and clogging, and eventually lead to water damage throughout the house. Regular cleaning eliminates this risk and keeps your gutter system functioning as intended.
When gutters are clogged, water is forced to overflow and spill over the sides of your roof, which can cause water to seep into shingles and roof tiles or through ceilings, resulting in water damage to your ceilings, walls, drywall and insulation. This can lead to costly repairs and replacements that could have been avoided with regular gutter cleaning.
In cold climates, clogged gutters can contribute to the formation of ice dams on your roof. These ice dams occur when melting snow refreezes along the edge of your roof where it meets the gutter. This prevents water from draining off the roof properly and can lead to interior leaks and mold. Regular gutter cleaning ensures that snow and ice flow off your roof as it melts, eliminating this problem.
Another issue caused by overflowing gutters is erosion. When water flows over the side of your gutter it can pull dirt and sand from your landscaping, which can damage plants and soil, and lead to rot and insect infestation. Regular gutter cleaning removes these hazards and allows your landscaping to thrive.
Gutter cleaning is an important part of maintaining your home or commercial property. This simple task can protect your home from many potential problems, including water damage, pest infestation, rust and mildew. It can also help prolong the life of your roof and improve your curb appeal. Gutter cleaning is often overlooked, but it’s a critical part of keeping your home or business safe and healthy. If you’re not comfortable working on a ladder or don’t have the time to clean your own gutters, contact a professional service. They will provide safe, efficient and affordable services that will keep your home or commercial property in top condition.